The Whole Yard

Tuesday, June 23, 2009

Garden photos - June 09

So, here's the garden from back on the 1st.


And what it looks like today:


Our attempts at container gardening - not bad, eh?


The grapevine. Last year it didn't do well at all, so this year we cut it back as far as I dared - more than 2/3 of the existing vine. I was worried when it didn't start budding this spring, but it's coming back beautifully.


Last, more of the Zebrina Mallow


Monday, June 22, 2009

Organic Gardening success story!

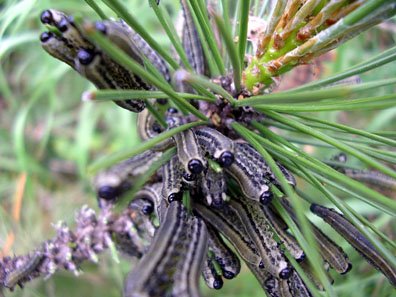
Every year our Mugo pine is infested by sawflies. Sawflies are the face of evil. Don't believe me?


The only thing that kills these suckers is this supremely toxic chemical crap that I won't touch with a 10-foot pole. We used it the first year we moved in and were almost as freaked out by the chemicals as the sawflies.

Last year we did nothing, partially because the chemicals scare me so I was relying on Eric to take care of it (and he is incredibly good at procrastinating when he wants to). They never really denuded the bush, but there were swaths that were cleared. So, letting nature run its course wasn't really an option.

This year I opted to do some manual pruning. I had to trim back the candles anyway as the bush is slowly growing to the size of a tree. As I was doing that I chopped off any branch that had the larvae on it and dropped it on the driveway. The birds appreciated the free feast and I didn't have to prune as much as I thought I would.

As a result, this year the bush looks happy and healthy - and all without chemicals!

Wednesday, June 17, 2009

Organic Lawn Care - Maintenance

To continue this series, let's address the topic of maintenance. It's all well and good to say that these chemicals are destroying the health of your family and the planet but then what do you do if you have a problem?

Assuming you've taken steps with aerating and amending to help build a solid foundation for your turf, the best thing to do is tackle the problems as they crop up. For example, we have a problem with clover this year more than the past few years. Clover is a well-known nitrogen-fixer, so that would point one in the direction of nitrogen deficiency.

That observation is backed up by another, more humbling, one - dog pee. Urine spots that people so often complain about are caused by nitrogen in the urine. Too much nitrogen in one area can burn the lawn. Which means if your dog's pee is burning your grass, in addition to other steps, you may actually want to reduce the amount of nitrogen you apply. The reverse is happening in our case - the spots where Lucky goes are some of the healthiest, thickest, fastest growing areas of the lawn.

Identifying the exact problem lets you pinpoint a specific solution. This saves you time, money, and helps reduce runoff and benefits the environment. In this case, it's a simple matter of applying a nitrogen-rich, phosphorous-free organic fertilizer. There are now several options on the market, even a mass-market one by Scotts. Butoffee grounds actually make an excellent option if you have a small lot or a specific area you want to treat - Starbucks and other chains even give their used grounds away for this purpose (be careful if you have pets, though, since coffee and coffee grounds are toxic to dogs if ingested).

As a rule, problems in the yard are symptomatic of nutrient or soil deficiencies. A simple search on the internet can turn up quick, easy and cheap (or free!) solutions to your problem.

Monday, June 8, 2009

Sunday, June 7, 2009

Mulching the Front

Yesterday and today, in between rain and thunderstorms, we completed one of the big to-do list items: Mulching the front yard. Some quick before/after pics and then some general photos of the work.

Before

After

Before

After


And an updated to-do list:
  • Power-wash trellis and mailbox post
  • Finish master plan of the yard
  • Clear out back woods
  • Get rid of barberry bush in back - fall
  • Trim large bush trio in back - fall
  • Re-landscape west wall bed (aka fireplace bed) (potentially optional)
  • Place stepping stones from garage to back yard (potentially optional)
  • Re-mulch front yard beds
  • Prune Mugo out front after killing the evil sawflies
  • Re-landscape garage bed
  • Re-level brick patio
  • Fill in holes in front bed (dead junipers and rose bushes)
  • Plan out vegetable garden
  • Look at and either remove or repair yard sink

Monday, June 1, 2009

Garden 2009

I think I mentioned we decided to do only two beds this year and just plant closer. So here we go.


If you notice spots of bright color, those are the annuals we planted in the beds - marigolds, petunias and nasturtium

Bed 1 - Beans, Peas, Collards

Bed 2 - Tomatoes, peppers, onions

Photos photos everywhere

Siberian Irises started blooming
Bean Bed - June 1, 2009

Things are HUGE

Columbine. This one is particularly loaded with blooms

Another Columbine... I think this one is my favorite.

Snow-in-summer - this guy didn't bloom last year

Tuesday, May 26, 2009

Paver Patio

Last fall, after one of the rain storms, our patio fire pit was filled with water. We emptied it out and watched as the water ran straight back to the house. This, along with a couple low spots, was enough to deem it worthy to put forth the effort the following year to re-level the patio. Anticipating that it was going to take a day or two to finish, we planned to attack this project over Memorial Day weekend.

Thursday I did investigation as to what would be involved in laying a paver patio. I used the following sites as resources for instructions to install a paver patio:

1.) http://www.hometime.com/Howto/projects/patios/patios_1.htm
2.)
http://www.hamiltonparker.com/hp%20files/DIY%20Paver%20%20Manual.pdf
3.)
http://www.ehow.com/how_4589649_paver-patio-detailed-doityourself-instructions.html
4.)
http://www.belgard.biz/howtoinstall.htm

I decided to take off on Friday to get a good jump on the project. I figured that I could get a good start on the project if not almost complete it in one day. Ambitious, yes, but it's good to have a goal to reach. So away we go...

DAY 1:
Here's how the patio looked before any of the work:

It took about 3.5 hours to remove the pavers and stack them off to the side:


Once the pavers were removed, I found that there was a 3-4 inch layer of sand between the pavers and the gravel base. I decided to remove the sand to get down to the gravel base so that I could reset the the base with a good layer of minus crushed limestone per the instructions from the sites noted above. By the end of the day, I got the sand removed so that there was only a good gravel base. Since it was late in the day, I finished with renting a plate compactor from Home Depot for the upcoming work on the following day.

Oh...perhaps this is a good moment to mention that I had forgot that the patio is about 20' x 12'(240 square feet)...so much for getting this done in one day.

Day 2:

After a good night's sleep, I was up and ready to go. I made one quick trip to Home Depot for a couple more bags of crushed limestone since it had, and was finishing raining the early part of the morning. Before laying out the limestone, considering I had taken off the top layer of sand (and sand-gravel mix), I made a couple initial passes with the compactor to set the base level.


I laid out about a 3" layer of crushed limestone and went over it with a number of passes with the plate compactor. Everything turned out great with the compactor except for the last pass or so because a bit of the limestone had stuck and hardened to the bottom of the plate compactor. Tip to the readers, if the compactor isn't providing a smooth result, there may be debris stuck or collecting on the bottom of the plate.


After compacting the layer of crushed stone, and before laying the sand, I put down a weed blocker/stone stabilizer. I'm not sure if this is actually going to do anything, but I figured I'd give it a try; if it works, great, else no big deal.

To lay down the sand, I used a couple of rods about 1" thick and a steel 2x4 to level out a layer of sand evenly across the patio. This was a time consuming effort as I had decided to reused the sand that was dug up from day 1. What took so long was that the layer of gravel had been mixed in with the sand. Before being able to lay down the sand, I had to rake the gravel stones out of the sand. I got most of the them, but certainly there was quite a bit that I missed. As I used the beam to level the layer of sand, and stone caught at the top would be dragged causing a crease in the top layer. So, I'd have to remove the stone, re-add sand, and re-level. As you can imagine, this added considerable time.


We slowly worked the rods down from one end of the patio to the other to ensure an even level of sand. Eventually once the rods were removed, as we layed the pavers, we filled in the grove with sand. It was about 1:00 pm on Saturday that we finally got around to laying the pavers.


Day 3:

We got close, but we didn't finish the work on day 2. I had to take back the plate compactor and Cathy ran into some troubles with the last bit of laying the pavers. So for day 3, I had to finish things off laying the pavers. Overall, it was very much like Legos laying out the pavers...until the very end. I made it all the way to the corner of the curve with just one tiny hole left to fill. The problem, I didn't have any pavers which fit the hole. So, the Legos now turned into a puzzle. Moving on brick here, one brick there, I eventually worked my way all the way back to the house when I finally got all the pavers to fit. I of course checked the level of things to make sure the patio was pitched away from the house and sure enough it was.


The last step was to sweep the sand into the spaces between the pavers. The websites had mentioned that one should use the plate compactor and go back over the pavers once they were laid so that they were set, but rather than renting the plate compactor again, I used a hand tamper and tamped the pavers into place whilst sweeping over the patio to fill in between the pavers. I'm not sure if that's going to cost me in the long run, but with what energy I had at that point in time, it seemed like the most correct decision.


Day 4:

Not much left to do on Monday except for cleanup. There was still a large pile of mixed sand and gravel on the driveway which I shoveled up and moved it to the back of the yard and started a path into the woods. I swept some of the remaining sand in between some spots that were still lacking. Over the next couple rainfalls or so, I'll have to do this a couple times.

I don't have a picture of the final look of the patio, but that was mainly due to the low energy level after all of the work from the weekend. No worries though...coming soon :)

Update: Here is the finished patio!

Re-visiting the To-Do list and Veggie Garden 2009

So, here is the updated 2009 To-Do List:
  • Finish master plan of the yard
  • Re-landscape garage bed
  • Re-landscape west wall bed (aka fireplace bed) (become potentially optional)
  • Re-level brick patio
  • Power-wash trellis and mailbox post
  • Fill in holes in front bed (dead junipers and rose bushes)
  • Plan out vegetable garden
  • Re-mulch front yard beds
  • Get rid of barberry bush in back
  • Place stepping stones from garage to back yard (potentially optional)
  • Look at and either remove or repair yard sink
  • Trim large bush trio in back
  • Prune Mugo out front after killing the evil sawflies
  • Clear out back woods (lots of dead and dying hardwoods)
Not bad, eh? The big item - the re-leveling the brick patio - happened this past weekend. Eric will be blogging about it but, suffice to say, I can barely move today.

We also planted the veggie garden this weekend. We changed plans slightly when at the nursery. We decided we're going to let the far-east bed go fallow this year and just plant 2 beds. Part of the change was because we decided that growing broccoli and other plants in that family wasn't worth the hassle. But also because we discovered that our local supplier has leeks, shallots and garlic available for growing! HEY!

So here's what's in the beds this year.

Bed 1: beans, peas, cucumbers, lettuce, spinach, chard, eggplant, chamomile, zucchini, summer squash, onions, shallots, collards
Bed 2: SIX tomato plants, two tomatillo plants, cilantro, rosemary, oregano, parsley, basil, jalapenos, habanero, poblano, bell peppers, onions, leeks, shallots, garlic

Sunday, May 24, 2009

Lotsa Photos!

Salvia in a Box

Blooming

Ajuga, salvia, columbine

Salvia

Columbine

Columbine

Ajuga!

Sedum

More Columbine

Columbine Bloom

Yarrow and Snow-in-Summer

The last Columbine

Columbine bloom

Yarrow

Lucky's favorite spot

Lucky in the garden

Another Lucky shot

Same shot, no dog

Yarrow blooms

LinkWithin

Related Posts with Thumbnails